Building a MERN Stack Javascipt App. In this tutorial we will be building a Java script using Node, Express, React and Mongo DB. Backend of our app is built using Node JS with help of Express framework. The frontend is coded using React JS. Mongo DB is used for storing the data.
Create the Project folder
Go inside the project folder in terminal and setup the react app.
> Create the React App
npx create-react-app frontent
Remove unwanted files. Create the basic react .jsx files and then run the app
npm start
Inside the App.js file copy paste all the contents of body tag in the index.html
Copy paste style.css file contents to index.css
Replace class with className
Copy paste images folder to the public folder
Add external css, js files to index.html in the public folder
Start Backend Coding
Go to root folder of the project and run
npm init
npm i express
create a folder called backend in the root folder
create file server.js , write the express app code
import express from 'express';
const app = express();

app.get("/", function(req,res){
    res.send("Server is ready");
});

app.listen(5000, function(){
    console.log("Serve at http://localhost:5000/");
})
Now run the server.js file from the root using,
node backend/server.js
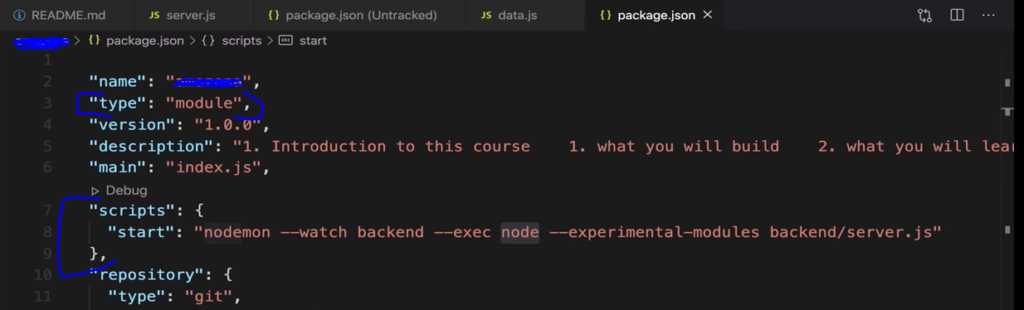
If any error, add "type": "module", in package.json
Install nodemon
This package helps to automatically refresh the server on code changes. Use the below code to install nodemon
npm i --save-dev nodemon
Add the following code in package.json of root folder
  "scripts": {
    "start": "nodemon --watch backend --exec node --experimental-modules backend/server.js",
  },
Connecting Frontend and Backend
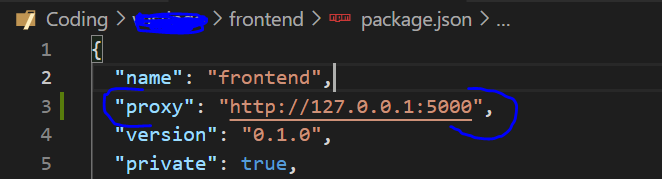
Setting proxy inside package.json in frontent folder
"proxy": "http://127.0.0.1:5000",
Install Axios Library
Axios is a library to send ajax request to server.
Go to frontent folder and install axios using the below terminal command
npm i axios
Next step is to define react hook with state to fetch data from backend
eg: const [products, setProducts] = useState([]);
The default value of products is empty array, when we want to change value of products we may use the setProducts
useEffect – Another hook that runs after rendering of the webpage.
Usage Example code
import React, { useEffect, useState } from 'react'
import axios from 'axios';

export default function ListingScreen(props) {

    const [listings, setListings] = useState([]);
    useEffect(() => {
        const fetchData = async () => {
            const {data} = await axios.get('/api/listings');
            setListings(data);
        };
        fetchData();
    }, []);

    const listing = listings.find(x => x.urlSlug === props.match.params.slug);
    if(listing){
        <h4> {listing.name} </h4>
     }
}
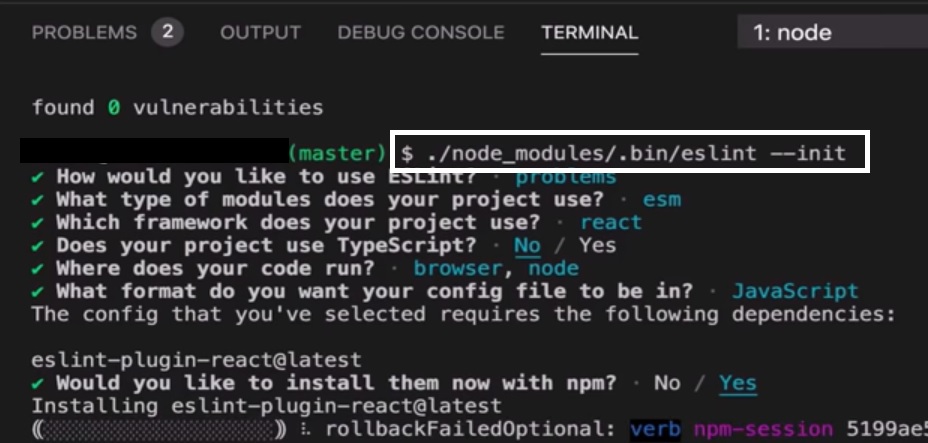
ES Lint Configuration for VS Code
Install the ESLint Plugin for VS Code

Install eslint dependency in the root dir , (install as development dependecy)
npm i -D eslint
./node_modules/.bin/eslint --init
Now create .env file inside frontent folder, add the following line
SKIP_PREFLIGHT_CHECK=true
Using Redux with react
Install redux and react-redux packages in the frontent folder using the below command
npm i redux react-redux
Create a redux store
- Go frontent/src folder and create file store.js
- Sample code of store.js is given below
import { createStore } from 'redux';
import listingData from './json/listings';

const intialState = {};
const reducer = (state, action) => {
    return {listing : listingData.listings};
};

const store = createStore(reducer, intialState);
export default store;
Using store with provider
import React from 'react';
import { Provider } from 'react-redux';
import ReactDOM from 'react-dom';
import App from './App';
import reportWebVitals from './reportWebVitals';
import './index.css';
import store from './store';

ReactDOM.render(
  <Provider store={store}>
    <React.StrictMode>
      <App />
    </React.StrictMode>
  </Provider>,
  document.getElementById('root')
);
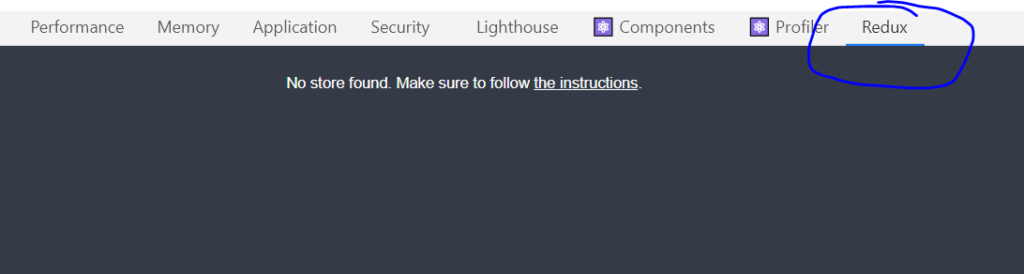
To test the redux, install Redux Dev tools Chome extension
After installation, in Chrome console panel (ctr + shift+ j) – we can see redux
Next install redux thunk – used to send ajax request in redux actions
npm i redux-thunk
store.js (update sample code)
import { createStore, compose, applyMiddleware } from 'redux';
import listingData from './json/listings';
import thunk from 'redux-thunk';

const intialState = {};
const reducer = (state, action) => {
    return {listing : listingData.listings};
};

const store = createStore(
    reducer,
    intialState,
    compose(applyMiddleware(thunk))
);
export default store;
Adding redux to chrome dev tools, update the store.js code like this:
const composeEnhancer = window.__REDUX_DEVTOOLS_EXTENSION_COMPOSE__  || compose;
const store = createStore(
    reducer,
    intialState,
    composeEnhancer(applyMiddleware(thunk))
);
export default store;
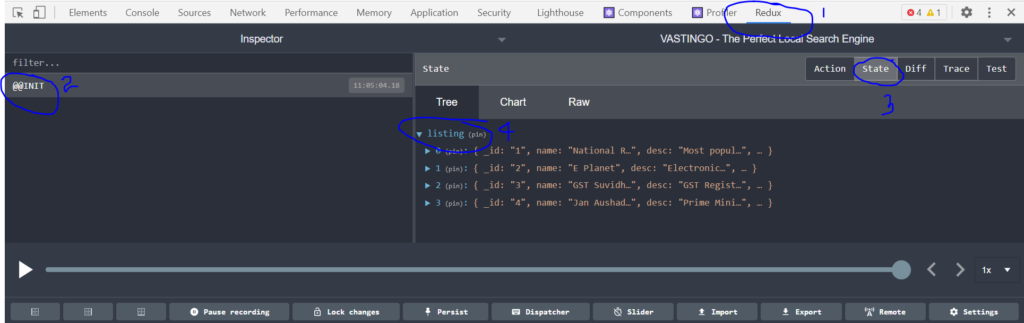
Redux in chrome shows like this,
Use redux to the app functions
Define constants and actions,
create folder : frontent/src/constants -> listingConstants.js
sample code:
export const LISTING_LIST_REQUEST = 'LISTING_LIST_REQUEST';
export const LISTING_LIST_SUCCESS = 'LISTING_LIST_SUCCESS';
export const LISTING_LIST_FAIL = 'LISTING_LIST_FAIL';
create folder : frontent/src/actions-> listingActions.js
sample code:
import Axios from 'axios';
import {
    LISTING_LIST_REQUEST,
    LISTING_LIST_SUCCESS,
    LISTING_LIST_FAIL
} from '../constants/listingConstants';

export const listListings = () => async (dispatch) => {
    dispatch({
        type:  LISTING_LIST_REQUEST,
    });
    try{
        const { data } = await Axios.get('/api/listings');
        dispatch({ type: LISTING_LIST_SUCCESS, payload: data});
    } catch(error){
        dispatch({ type: LISTING_LIST_FAIL, payload: error.message});

    }
};
Next create folder frontent/src/reducers , Inside that create file listingReducers.js